
How to Set Up Network Folder Forwarding
This article provides instructions on how to configure Network Folder Forwarding on a Lexmark MFD.
Info, Notes and Warnings
Configuring a Network Folder as a UNC path along with assigning a user to it for permissions are out of scope for this tutorial.
The inability to deliver faxes to the network folder will cause a backlog in your ETHERFAX account.
This is because ETHERFAX will only remove items from your inbox when the Lexmark confirms successful delivery.
Permission issues or anything else that would prevent these faxes from being confirmed as downloaded will trigger an alert on your account notifying you of the stuck faxes.
We would advise keeping Inbox Alerts on for this reason. More on alerts here: How to Configure Alert Settings.
Prerequisites
Before reading these instructions be sure that the following prerequisites are met:
Access to the Lexmark GUI via its IP Address.
Instructions: How to Determine your Lexmark MFD's IP Address.
A UNC path to receive the faxes
A Local System user (Windows systems) or Service Account user (Unix systems) with sufficient privileges to the intended Network folder.
A route assigned to your device.
Instructions
How to set up network folder forwarding
Enter the Lexmark’s IP Address into a web browser.
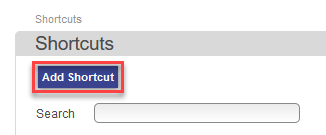
Select Shortcuts and then click the Add Shortcut button:
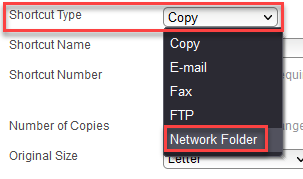
Change the Shortcut Type to Network Folder:
Input the Share Path that you intend to use:

When inputting the Share Path be sure to include the path to the host and share.
Example: //ServerName/Share or \\ServerName\Share.
The slashes used will depend on whether you are using a Unix-based OS or Windows-based on where this UNC path is located. The latter example is Windows-based.
If you are not sure whether your MFP can resolve your network server by name, then you may also need to use the IP address of the server.
If you are using a domain to authenticate this share, enter the Domain name in Workgroup:

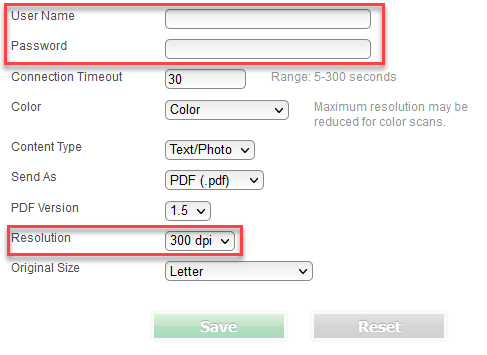
For Authentication, select Use Assigned username and Password from the drop-down and input the Username and Password of an account with write access to the share.
The Lexmark device needs to pass along a username/password combination to access the UNC path.
Even if the path were configured where no authentication was required, there would be issues delivering the faxes to this location for that reason.
Set the resolution to either 200 or 300 DPI to take full advantage of incoming fax quality.
Before you leave the page be sure to make note of the Shortcut Number, as it will be needed later. Click Save when complete:
You can also use this section to determine what format these faxes will be saved as. This is dictated by the Send As value.
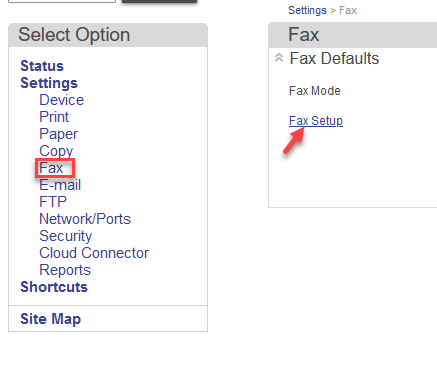
Go to Settings > Fax > Fax Setup:
Click on Fax Receive Settings to open its related settings. Click Admin Controls.
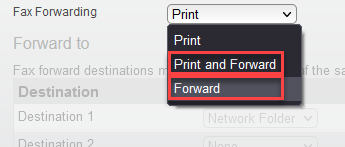
On this page, on the Fax Forwarding field, then select an option in the drop-down. Select an option that includes forwarding.
This will either be Print and Forward or Forward:
On Destination 1 (or whichever Destination is available), make sure the Type is set to Network Folder and then input the Shortcut Number gathered from before. Then choose Save.
If you are using the Called Number-type routing, then set Type to Called Number on Step 7.
The Shortcut Number field will become grayed out because the routing is dynamic and based on the Shortcut Name.
You have now set up Network Folder Forwarding on your Lexmark MFD!
Ending Notes and Details
Using a Forward only Fax Forwarding option opens up a potential to stuck inbox items if the Lexmark does not have sufficient privileges to write to the folder.
The same is true with a Print and Forward method, however, you may still get the fax due to being able to print it. However, the ETHERFAX account would likely still have the inbox item.