How to Register your Firmware-level ETHERFAX-integrated MFD with ETHERFAX
This article provides instruction on how to register your firmware-level ETHERFAX-integrated MFD with ETHERFAX.
Info, Notes and Warnings
Registered MFDs can send faxes without a route assigned to them.
If you do not see the Fax option in the left-hand navigation bar, then you may need to sign in using the Log In button in the upper-right of the MFD’s GUI
Prerequisites
Before reading these instructions be sure that the following prerequisites are met:
An etherFAX account.
An etherFAX portal user.
The Global Administrator, or
one with the Edit Customer role.
Access to your MFD GUI via its IP Address.
Instructions on this can be found here: .
The etherFAX License file installed onto your device.
Instructions on this can be found here: How to Install the ETHERFAX License File.
Instructions
How to set up your firmware-level ETHERFAX-integrated MFD for ETHERFAX
With the ETHERFAX license file installed, enter the MFD’s IP Address into a web browser.
Select Device from the left-hand navigation bar.
Looking at Date and Time, confirm that the correct values are present. If they are not, select Date and Time and adjust the Time Zone. Once complete, click Save.
Select Fax from the options on the left-hand navigation bar.
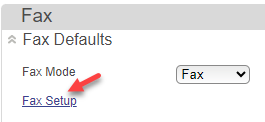
Under Fax Mode select Fax. Then select Fax Setup:

Selecting a Fax Mode of Fax Server will cause issues in receiving faxes where the device may still connect to ETHERFAX. Be sure to avoid this Fax Mode when connecting to ETHERFAX.
Provide a Fax Name and Fax Number. It is not required; however, an error may appear on the Lexmark without one.
On the drop-down for Fax Transport. Select etherFAX. Click Save.
Return to the main page and select Reset Printer. The printer will now reboot, using the etherFAX option for Fax Transport.
Confirm that the settings are correct by revisiting the Fax Transport option to make sure it is still set to etherFAX.
How to register your firmware-level ETHERFAX-integrated MFD with etherFAX
Visit the ETHERFAX Client Portal (https://clients.connect.etherfax.net) and sign into your account.
Click Endpoints > Devices, then click the + Device button in the upper-right corner.
Set the Endpoint types to Lexmark. This will be needed regardless of brand so long as it is a valid device. More info on valid MFDs here.
Paste the device’s serial number copied per the instructions here into the Serial Number field. Enter a Description, Local ID and Caller ID.
On the same page, be sure to toggler Device Enabled to on and then click Save in the upper-right corner.
You will be returned to the Device page thereafter. The Serial Number for your entry will now have a prepended LXK.
If there is an available fax number on the account that you wish to pair to this device, click the Serial Number of the device or click Edit under Action to enter the Edit Endpoint page.
Within the Assigned DIDs section you will see a drop-down listing the Available DIDs on your account that have not yet been assigned.
Once set to the desired number, click Assign DID. Once complete, click Save.
Confirm the registration was successful
Revisit the Endpoints > Devices page and make note of the Registered column for the device you aim to register:

If the Registered column is populated with a date, this means it has successfully registered to ETHERFAX.
You will now be able to receive faxing jobs directly at the MFD at that fax number. Even without a fax number assigned, if the device is registered, you will be able to send faxes from your MFD!
If not, return to your MFD and go to Fax > Fax Setup > HTTPS Fax Settings and expand the tab.
Check the HTTPS Fax Status for more descript explanation of the issue. Address as needed.
Should any assistance be needed, please contact support@etherfax.net for help.
Ending Notes and Details
Sometimes devices do not automatically reboot. Use the Reset Printer button on the MFD’s main page to initiate a reboot.
There is no need to include the leading LXK when creating entries. Doing so will cause issues as the entry will automatically prepend this value.
Errors seen in the HTTPS Fax Status section of the MFD’s HTTPS Fax Settings may be helpful when troubleshooting issues.
