How to Disconnect a Route
This tutorial provides instructions on two methods to disconnect routes on your etherFAX account.
Info, Notes and Warnings
Please exercise extreme caution when performing these actions.
To request a disconnect on a route is to forfeit that number entirely to the point that it is no longer hosted with etherFAX.
Once completed, it is impossible to regain specific lost routes unless it has left from etherFAX via a port out where it can then be ported back in.
Prerequisites
Before reading these instructions be sure that the following prerequisites are met:
An etherFAX account.
An etherFAX portal user.
The Global Administrator, or
one with the Edit Customer role.
A route.
Instructions
How to disconnect a route—checkbox method
Sign into the etherFAX Client portal at https://clients.connect.etherfax.net.
On the left-hand side, click on Assigned DIDs:

Click the checkbox on the route(s) where you would like to make a change:

Within the Bulk Operation drop-down, select Request Disconnect, enter a Reason and then click Apply Change:

The route(s) have successfully been submitted for disconnect where a ticket is created with the etherFAX Line Number Porting team.
They will follow up via email on that ticket to provide updates on the status of the disconnect request.
How to disconnect a route—upload disconnect method
Sign into the etherFAX Client portal at https://clients.connect.etherfax.net.
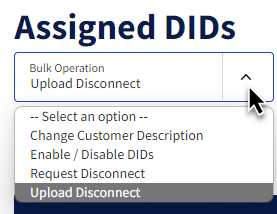
On the left-hand side, click on Assigned DIDs:
Select the Bulk Operation drop-down and then select Upload Disconnect:
With the Browse button now available, select a CSV or TXT file listing the route(s) on the account you would like disconnected.
Enter a reason in the Reason field, then click Apply Change.
A pop-up will appear asking to confirm the choice. Select Yes if you still wish to disconnect the routes listed in your uploaded document.
If the file has numbers listed in the account and follows the correct format with no clerical errors, then you will have now completed the upload disconnect request!
Ending Notes and Details
When uploading the disconnect request with .txt files. The contents should list each number to be disconnected on each row.
Example:
[fax number 1]
[fax number 2]
…
[fax number 10]
When uploading the disconnect request with .csv files. The contents should list each number as separated by a comma.
Example:
[fax number 1], [fax number 2], …, [fax number 10]
Note: A space following the comma should not be an issue. Nor should no spaces.
Sometimes, .csv files can have issues when being exported in Excel. If you run into any issues, be sure to open the file in Notepad, or a similar program to check for errors. Using the .txt format above may help during .csv-related issues.
Check for clerical errors as they may affect your ability to upload the request. For ease, we recommend the .txt format with entries on each row.
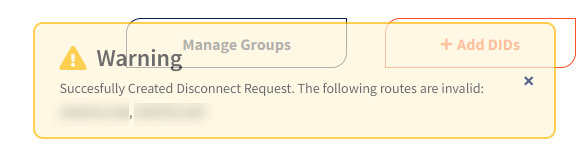
If the document does not list the records in the correct format, an error will appear listing the routes that could not be honored in this request: